« Rpimidi » : différence entre les versions
Sauter à la navigation
Sauter à la recherche
(→Pi) |
m (→Pi) |
||
| (4 versions intermédiaires par le même utilisateur non affichées) | |||
| Ligne 42 : | Ligne 42 : | ||
</syntaxhighlight> | </syntaxhighlight> | ||
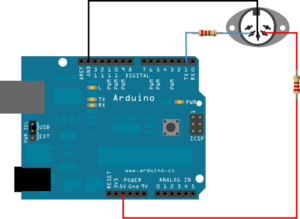
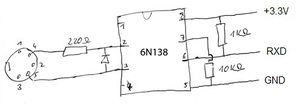
* [ | * Câblage | ||
[[Fichier:MIDI bb.png|center|thumb|Câblage Arduino - port MIDI]] | |||
[[Fichier:Gpio midiin circuit.jpg|center|thumb|Câblage port MIDI - PI]] | |||
=== Pi === | === Pi === | ||
| Ligne 66 : | Ligne 69 : | ||
</syntaxhighlight> | </syntaxhighlight> | ||
* Tester (une fois que l'Arduino est bien connecté au Pi) | * Tester (une fois que l'Arduino est bien connecté au Pi par l'intermédiaire du port MIDI) | ||
<syntaxhighlight lang="bash"> | <syntaxhighlight lang="bash"> | ||
/usr/src/ttymidi/ttymidi -s /dev/ttyAMA0 -b 38400 -v | # Lancer une capture depuis /dev/ttyAMA0 et creer un client MIDI Alsa "test" | ||
/usr/src/ttymidi/ttymidi -s /dev/ttyAMA0 -b 38400 -v -n test | |||
Serial 0x90 Note on 000 042 127 | Serial 0x90 Note on 000 042 127 | ||
Serial 0x80 Note off 000 042 000 | Serial 0x80 Note off 000 042 000 | ||
Serial 0x90 Note on 000 042 127 | Serial 0x90 Note on 000 042 127 | ||
</syntaxhighlight> | |||
* Depuis un autre shell sur le PI, capturer le flux MIDI et l'écrire dans un fichier | |||
<syntaxhighlight lang="bash"> | |||
sudo apt-get install midish | |||
smfrec -i test /tmp/test.mid | |||
</syntaxhighlight> | |||
* Sitôt le fichier ''test.mid'' rappatrié, il est possible de le tester avec ''timidity'' (depuis un poste disposant d'une sortie audio ^^) | |||
<syntaxhighlight lang="bash"> | |||
timidity test.mid | |||
</syntaxhighlight> | </syntaxhighlight> | ||
Dernière version du 30 novembre 2016 à 09:58
Objectif
Utiliser un Raspberry Pi comme enregistreur d'un piano numérique Yamaha via le protocole MIDI et les ports GPIO du Pi.
Plate-forme de test
- Un Raspberry Pi avec la dernière Raspbian
- Un Arduino pour simuler le piano Yamaha et envoyer des notes au format MIDI
Arduino
- Récupérer la librairie MIDI pour Arduino
- Insérer le code de test suivant dans l'Arduino
#include <MIDI.h>

// Simple tutorial on how to receive and send MIDI messages.
// Here, when receiving any message on channel 4, the Arduino
// will blink a led and play back a note for 1 second.

MIDI_CREATE_DEFAULT_INSTANCE();

#define LED 13   		    // LED pin on Arduino Uno

void setup()
{
    pinMode(LED, OUTPUT);
    MIDI.begin(4);          // Launch MIDI and listen to channel 4
}

void loop()
{
    digitalWrite(LED,HIGH);
    MIDI.sendNoteOn(42,127,1);  // Send a Note (pitch 42, velo 127 on channel 1)
    delay(1000);		        // Wait for a second
    MIDI.sendNoteOff(42,0,1);   // Stop the note
    digitalWrite(LED,LOW);
    delay(1000);
}
- Câblage
Pi
- Editer /boot/config.txt, ajouter les lignes suivantes et redémarrer :
init_uart_clock=2441406
init_uart_baud=38400
dtparam=uart0_clkrate=3000000
- Installer ttymidi :
sudo apt-get install libasound2-dev
cd /usr/src
wget http://www.varal.org/ttymidi/ttymidi.tar.gz
tar xf ttymidi.tar.gz
cd ttymidi
sed -i 's/-lasound/-lasound -lpthread/' Makefile
make
- Tester (une fois que l'Arduino est bien connecté au Pi par l'intermédiaire du port MIDI)
# Lancer une capture depuis /dev/ttyAMA0 et creer un client MIDI Alsa "test"
/usr/src/ttymidi/ttymidi -s /dev/ttyAMA0 -b 38400  -v -n test
Serial  0x90 Note on            000 042 127
Serial  0x80 Note off           000 042 000
Serial  0x90 Note on            000 042 127
- Depuis un autre shell sur le PI, capturer le flux MIDI et l'écrire dans un fichier
sudo apt-get install midish
smfrec -i test /tmp/test.mid
- Sitôt le fichier test.mid rappatrié, il est possible de le tester avec timidity (depuis un poste disposant d'une sortie audio ^^)
timidity test.mid


