Hyperconverged Supermicro a2sdi-4c-hln4f
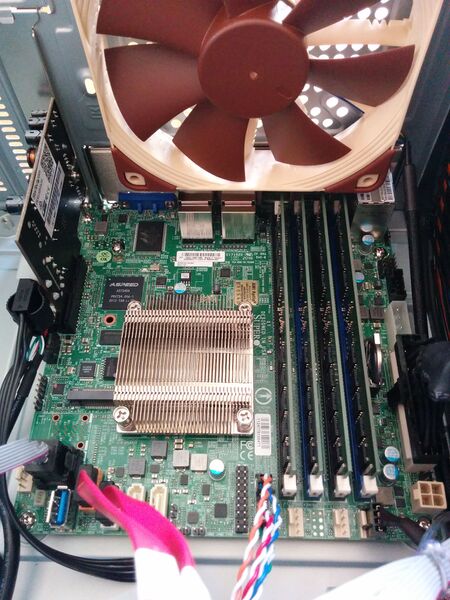
This howto aims at describing the choices and the build of a compact homelab with a hyperconverged chassis based on a Supermicro A2SDi-4C-HLN4F motherboard. The hypervisor OS will be Slackware64-current (with Qemu/KVM for virtualization), the storage will be provided by a Truenas core VM (thanks to pci-passthrough) and network orchestrated by an OPNSense VM.
Motivations
Why such a motherboard with a modest 4 cores Intel Atom C3558 ? Let's see the advantages :
- obviously, it's very compact (mini-itx form factor)
- up to 256 GB ECC RDIMM RAM supported
- the CPU has a very low TDP (~ 17W), so no need for a fancy and potentially noisy cooling solution
- 4 * 1 Gb/s Ethernet ports (cool for a network appliance such as OPNSense and there's no need for 10 Gb/s for this project)
- dedicated IPMI Ethernet port
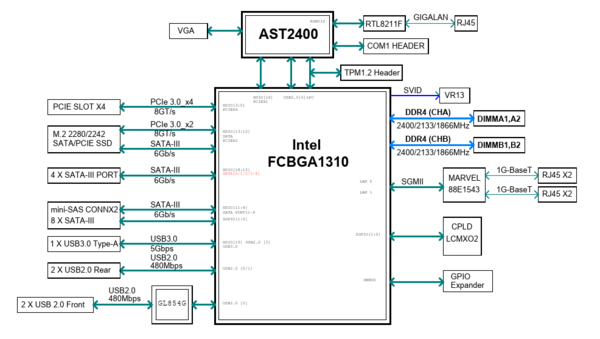
- the SATA ports are provided by two distinct PCIe lines (see below, very important for pci-passthrough and no need for an additionnal HBA card)
Well, the system has drawbacks too :
- the CPU power will not be extraordinary
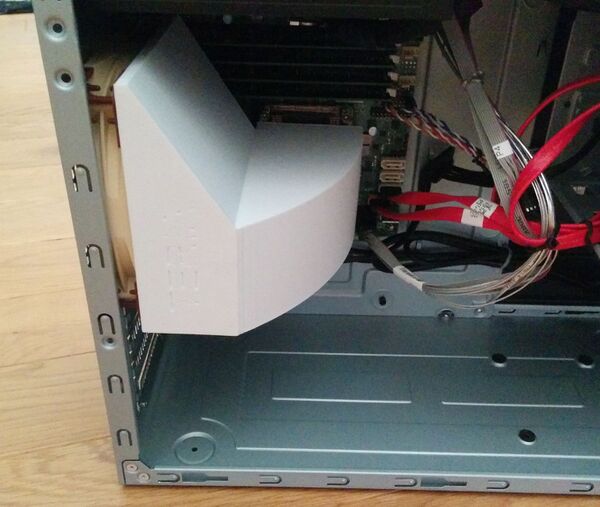
- it's not possible to put a fan directly on top of the CPU heatsink (more on that later)
- no external USB 3.0 ports (ony one "internal", on the motherboard itself) ; this is desirable to plug an external HDD for local backups (USB 2.0 is too slow)
Hardware
2.5 or 3.5 inches drives ?
What is required for this project :
- mini tower format chassis
- Hypervisor OS on mirror (RAID 1 in zfs terminology) with two drives
- at least 4 TB of encrypted data with a minimum of resilience (mirror or raidz1 / raidz2 ...)
- it is recommended not to exceed 80% of the capacity of a ZFS filesystem, so, for 4 TB of usable data, 5 TB of raw capacity is required
- all disks easily accessible from the front of the chassis
Choosing between 2.5 (SFF) or 3.5 (LFF) inches drives is not so easy. Obviously, for raw capacity over a gigabit network, LFF HDD are unbeatable in terms of price. In France (as of march 2021), it costs ~ 80 euros for a 2 TB NAS 3.5 LFF HDD ... Same price for a 1 TB NAS SFF HDD. Moreover, SFF HDD over 2 TB simply doesn't exist for consumer NAS systems (enterprise SFF HDDs exist but are way too expensive). LFF HDD are a clear winner ? What about chassis size, cooling, noise and iops ?
At this point, there are two choices :
- 2 * 500 GB SFF SSD (RAID 1 for hypervisor and VMs OS) plus 2 * 6 TB LFF HDD (mirror storage)
- 2 * 500 GB SFF SSD (RAID 1 for hypervisor and VMs OS) plus 4 * 2 TB SFF SSD (raidz1 storage)
The most reasonable would be to use LFF HDDs but silent operation in a tiny chassis with decent iops are very important, so let's stick with the "unreasonable" configuration !
Cooling the CPU
As seen earlier, a standard CPU fan cannot be fitted on the heat sink. But we are in the 21st century and 3D printing is available, so why not a custom CPU fan shroud ? ^^
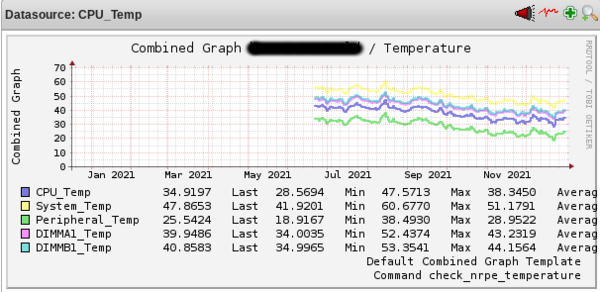
Is it absolutely necessary ? I don't think so. Does it help ? Sure ! On a similar system located in an attic (so hot in summer), I attached the measured temperatures over the last months (see below). No more than 47 °C for the CPU ... Without the fan shroud, I think you should expect overall 5 °C more on average.
Final system
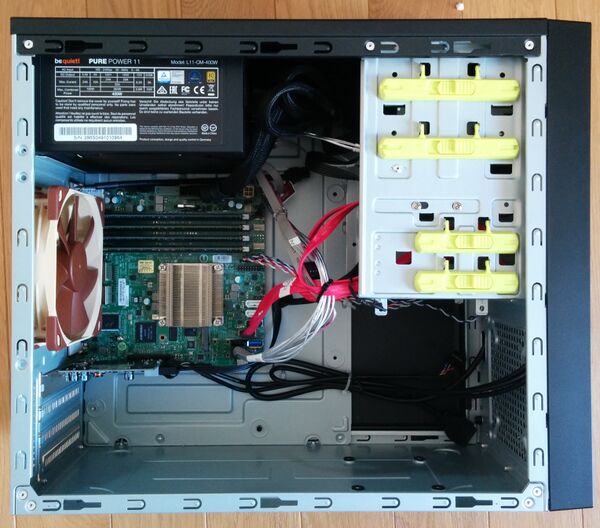
- Chieftec mini tower case
- Be Quiet 400W 80plus gold PSU
- Supermicro A2SDi-4C-HLN4F
- 64 GB DDR4 RAM ECC (4 * 16 GB RDIMM)
- ToughArmor MB992SK-B for hypervisor and VMs OS with 2 * WD SA500
- ToughArmor MB994SP-4SB-1 for data storage (with fans off) with 4 * Crucial MX500
- PCIe card with 2 * USB 3.0 ports
Installation
BMC setup
First things first, taking control of the BMC. These days, Supermicro's BMC are configured by default for DHCP and dedicated Ethernet port. There is no more the "ADMIN" default password but a random one written on a sticker directly on the motherboard (along with the MAC address of the BMC). Be sure to remember these informations before plugging the dedicated port on a switch of your your LAN.
With the MAC address in mind, it should be easy to retrieve the IP address assigned by the DHCP server, or (better), you could assign a dedicated IP address to your BMC within the DHCP server.
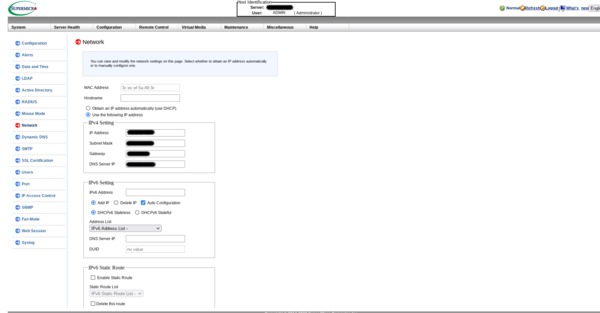
Then I suggest you configure the BMC with a fixed IP address, not an IP attributed by a DHCP server. If your LAN goes berserk and you have to connect to your BMC, it will be easier. Two choices : through the WebUI (example below) or through the UEFI BIOS.
With the BMC configured, you have full control of your system through your favorite Web browser. HTML5 web Console Redirection is a fantastic feature not often available for free with other vendors (such as Dell, HPE or Lenovo for example).
PXE boot
It's of course possible to install your favorite OS by booting thanks to a USB stick. Having already an operational homelab, PXE boot is even easier and quicker. With the Supermicro a2sdi-4c-hln4f, there is just one caveat : no legacy boot available, only UEFI (well, the manual and options within the BIOS suggest legacy should be possible but in reality it's not working at all).
Through the UEFI BIOS options, you should verify the boot order or press F12 during the boot of the system and choose UEFI Network.
Operating system (slackware64-current)
Installtion
Let's assume a Slackware Busybox prompt is available (resulting either from booting with a USB key or through network). The soft RAID 1 has to be configured at this stage, of course on the right disks ! (remember, the system is composed of 6 drives, 2 SSDs for OS and 4 SSDs for data).
The lsblk command is a good tool to retrive and identify the drives connected to a system. On the Supermicro a2sdi-4c-hln4f, the 4 drives connected to the mini-SAS port are identified first (sda, sdb, sdc, sdd), the 2 more drives connected to tradtionnal SATA ports come next (sde, sdf). It is on those two drives (sde, sdf) that the soft RAID 1 is going to be configured.
Reference documentation for this kind of setup :
I recommend two identical partitions per disk (sde and sdf) such as :
# fdisk -l /dev/sde
Disk /dev/sde: 465.76 GiB, 500107862016 bytes, 976773168 sectors
Disk model: WDC  WDS500G1R0A
Units: sectors of 1 * 512 = 512 bytes
Sector size (logical/physical): 512 bytes / 512 bytes
I/O size (minimum/optimal): 512 bytes / 512 bytes
Disklabel type: gpt
Disk identifier: 96BE3679-F270-4EA4-88FF-2935AE4DCB46

Device      Start       End   Sectors   Size Type
/dev/sde1    2048    534527    532480   260M EFI System
/dev/sde2  534528 976773134 976238607 465.5G Linux RAID
When you're done with one disk (e.g. sde), you can clone the partionning to another disk (e.g. sdf) with these commands :
sgdisk -R /dev/sdf /dev/sde # clone
sgdisk -G /dev/sdf # set a new GUID
Let's build the soft RAID 1 :
mdadm --create /dev/md0 --level=1 --raid-devices=2 /dev/sde2 /dev/sdf2Checking disk synchronization :
watch -n2 cat /proc/mdstatSaving the RAID configuration for system boot :
mdadm --examine --scan > /etc/mdadm.confUsing LVM afterwards is a good option :
pvcreate /dev/md0
vgcreate <MY_VOLUME> /dev/md0
lvcreate -L+1g -nswap <MY_VOLUME>
lvcreate -L+4g -nroot <MY_VOLUME>
...
Then you can launch the famous Slackware setup command and proceed through the OS installation itself. Don't forget to create an initrd (thanks to mkinitrd_command_generator.sh which should choose the right options) and be sure to use elilo (or grub) as a bootloader.
Here is my elilo.conf as an example :
chooser=simple
delay=1
timeout=1
#
image=vmlinuz
        label=vmlinuz
        initrd=initrd.gz
        read-only
        append="root=/dev/system/root vga=normal ro consoleblank=0 transparent_hugepage=never hugepagesz=1G default_hugepagesz=1G hugepages=60 intel_iommu=on iommu=pt libata.allow_tpm=1 preempt=none"
Little explanations :
- transparent_hugepage=never hugepagesz=1G default_hugepagesz=1G hugepages=60 : 60 hugepages of 1GB of RAM reserved for virtualization
- intel_iommu=on iommu=pt : recommanded options for PCI devices passthrough
- libata.allow_tpm=1 : recommanded option for SED disks (more on that later)
- preempt=none : disable kernel preemption (only really useful for desktop systems)
Booting
It's the tricky part ... Supermicro does not allow a command such as efibootmgr to insert or modify boot options in the UEFI subsystem (as mentioned in a Supermicro FAQ) ... At least if you are using an unsigned Linux kernel and no secure boot. It's technically feasible with Slackware ([https://docs.slackware.com/howtos:security:enabling_secure_boot as explained here) but I never tested it.
I scratched my head a little while on this matter and found a solution online
